AWS EC2에서 Nginx와 Certbot으로 Let's encrypt SSL 인증서 발급하기
AWS EC2 인스턴스에서 Nginx를 사용하여 Let’s encrypt SSL 인증서를 발급받고 Certbot으로 인증서 자동갱신까지 설정하는 방법을 다룹니다.
- 들어가기 전에
- 사전 준비 환경
- DNS 체크
- docker-compose.yaml 작성
- nginx.conf 파일 작성
- Nginx 임시 실행
- Certbot으로 SSL 인증서 발급
- docker-compose.yaml 파일 업데이트
- nginx.conf 파일 업데이트
- docker-compose 실행
- 마치며
들어가기 전에
프로젝트를 진행중에 백엔드 개발서버를 배포해야 할 상황이 와서 급하게 EC2와 RDS를 만들고 SSL 인증서를 발급받으려고 할 때 갑자기 이런 생각이 들었습니다. “이거 블로그에 정리해두면 좋겠다!” 라고…
백엔드 서버의 배포과정을 A to Z로 정리하면 좋겠지만…
이미 AWS 세팅은 대부분 완료된 상태라서, SSL 인증서 발급과정만 정리해보려고 합니다.
사실 SSL 인증서 발급 부분도 처음 적용하는 사람 입장에서는 헷갈릴 수 있는 부분이 많아서, 블로그에 정리해두면 분명 다른 사람들에게 도움이 될 거라고 생각합니다! (실제로 저도 처음에는 많이 헤맸거든요… ㅎㅎ;;)
사전 준비 환경
일단 저의 환경은 아래와 같습니다.
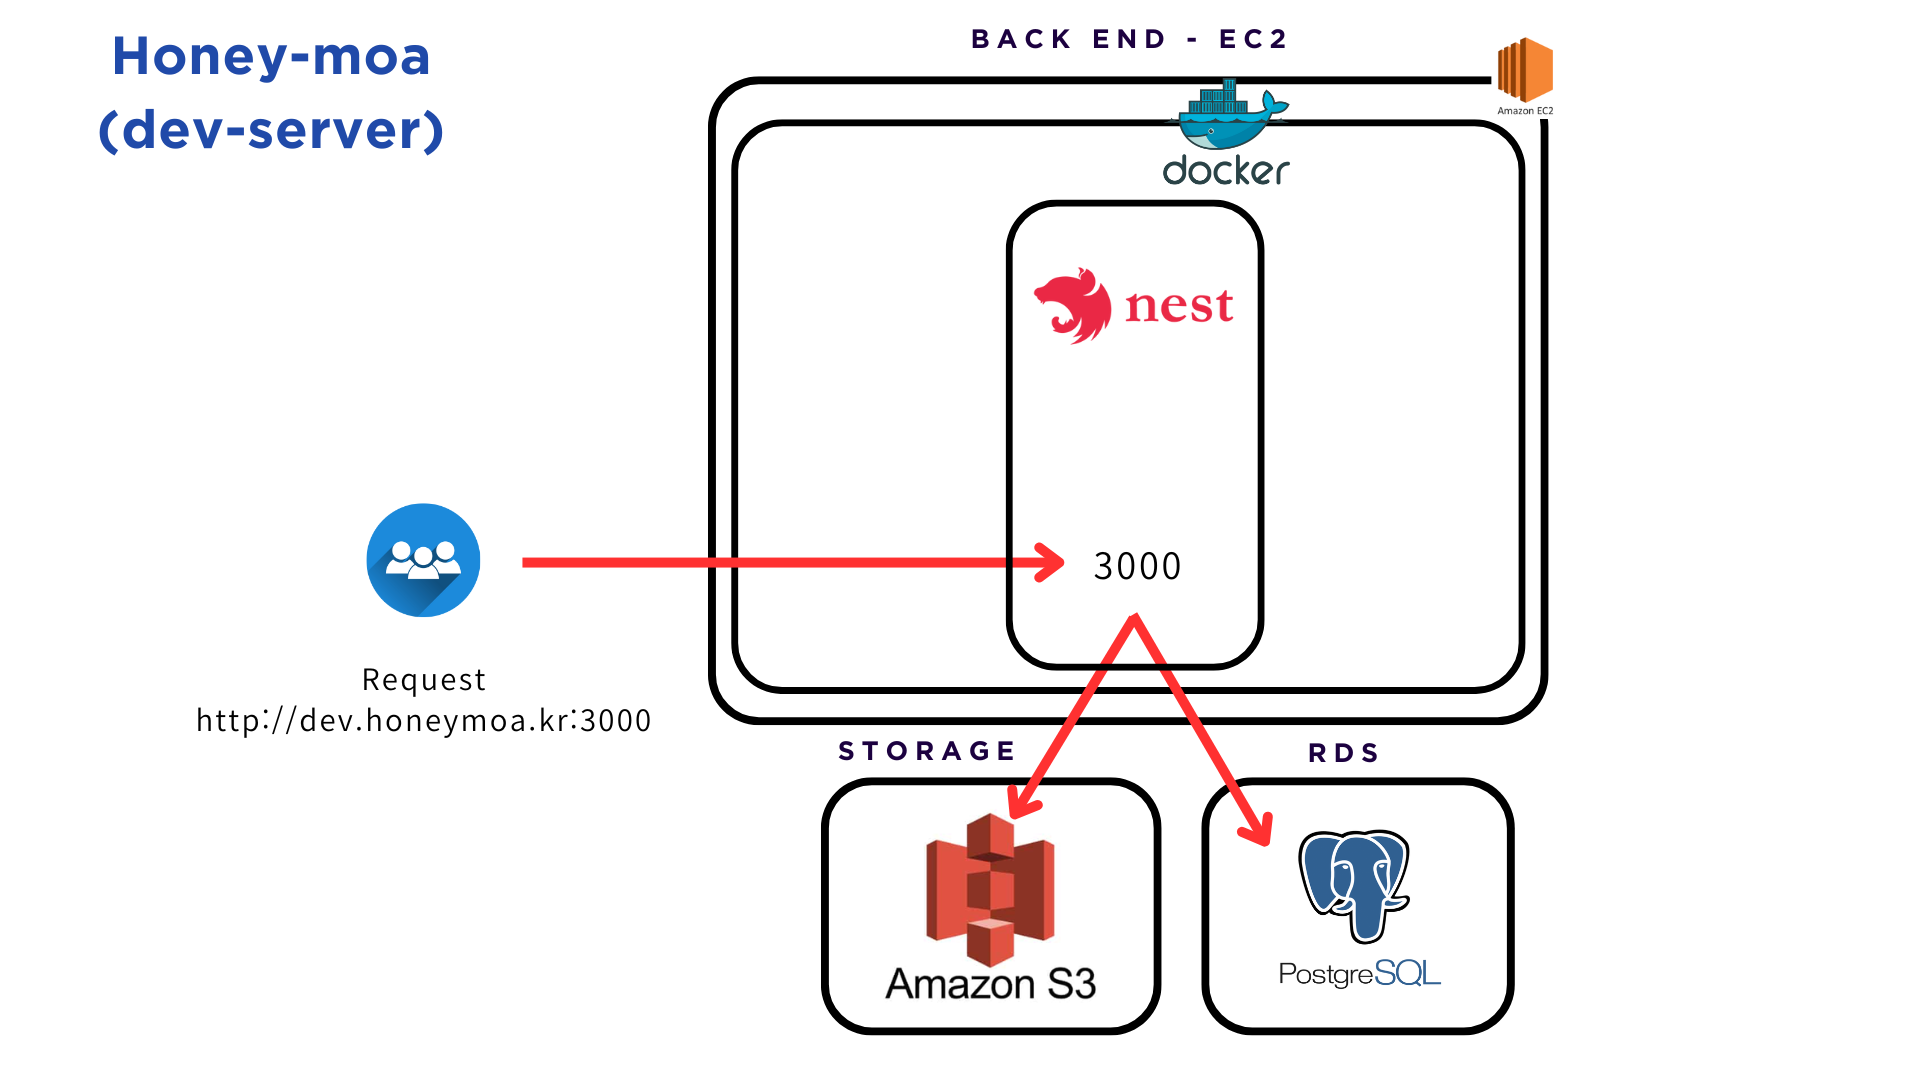
- AWS EC2 인스턴스 (Ubuntu)
- 도메인 구매 및 연결 (가비아, AWS Route53)
- EC2에서 Docker로 백엔드 서버 실행
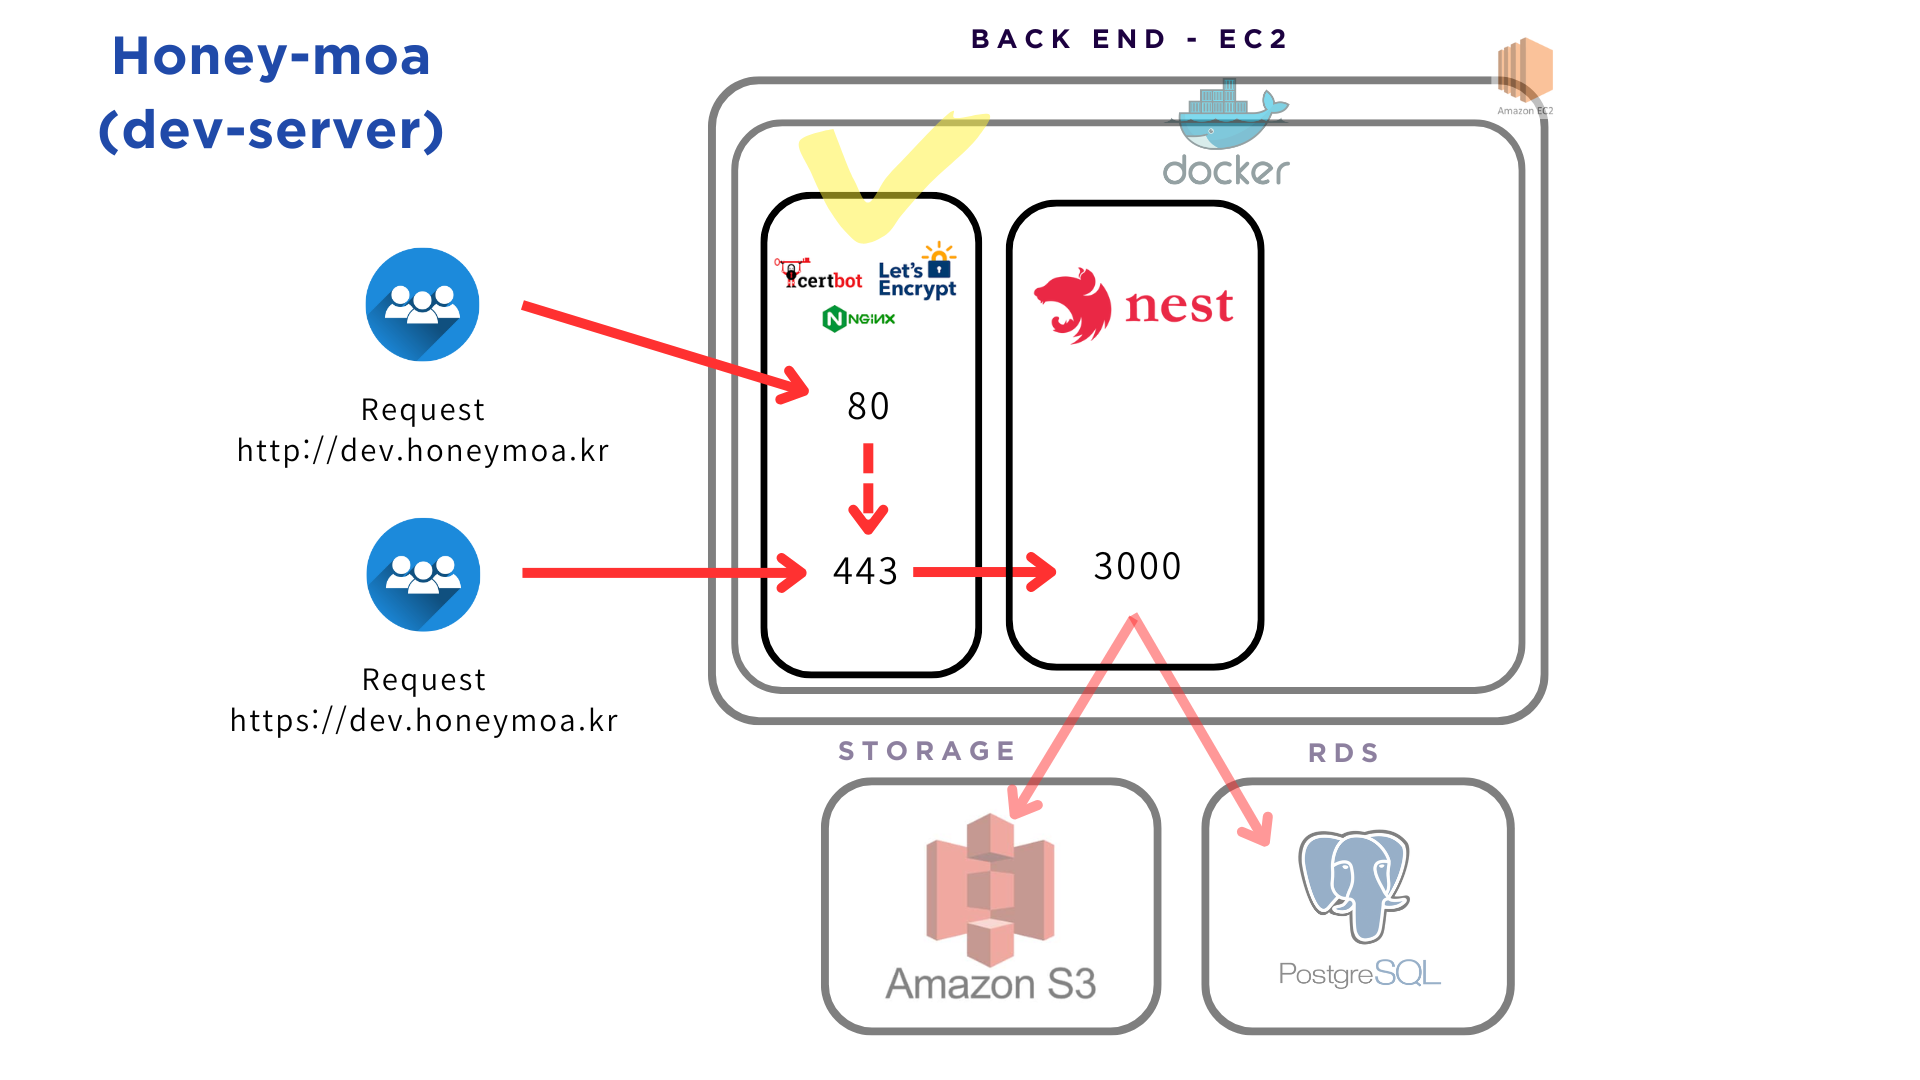
해당 환경을 다음과 같이 수정해보려 합니다.
여기서 도메인 구매는 필수가 아니기 때문에 EC2 인스턴스에 할당된 퍼블릭 IPv4 주소를 사용해도 괜찮지만, 저는 도메인을 구매했기 때문에 도메인을 사용해서 진행하겠습니다.
Docker를 사용하지 않고 EC2 인스턴스에 Nginx를 설치하고 SSL 인증서를 발급받는 방법도 있지만, Docker를 사용하면 더 간편하게 관리할 수 있기 때문에 저는 Docker 사용을 추천드립니다.
EC2 인스턴스에 Docker 및 docker-compose 설치는 아래 명령어를 차례대로 입력하시면 됩니다.
# 1-1. 프로그램 설치 전 우분투 시스템 패키지 업데이트
$ sudo apt-get update

# 1-2. 필요한 패키지 설치
$ sudo apt-get install apt-transport-https ca-certificates curl gnupg-agent software-properties-common

# 1-3. Docker의 공식 GPG 키 추가
$ curl -fsSL https://download.docker.com/linux/ubuntu/gpg | sudo apt-key add -

# 1-4. Docker의 공식 apt 저장소 추가
$ sudo add-apt-repository "deb [arch=amd64] https://download.docker.com/linux/ubuntu $(lsb_release -cs) stable"

# 1-5. 시스템 패키지 업데이트
$ sudo apt-get update

# 1-6. Docker 설치
$ sudo apt-get install docker-ce docker-ce-cli containerd.io

# 2-1. Docker Compose 설치
$ sudo curl -L "https://github.com/docker/compose/releases/download/1.27.4/docker-compose-$(uname -s)-$(uname -m)" -o /usr/local/bin/docker-compose

# 2-2. 다운로드 한 파일에 권한 설정
$ sudo chmod +x /usr/local/bin/docker-compose

# 2-3. Docker Compose 버전 확인 (정상적으로 설치되었는지 확인)
$ docker-compose --version
DNS 체크
도메인을 구매하신 분들이라면 DNS가 정상적으로 설정되었는지 확인해보셔야 합니다.
터미널에서 아래 명령어를 입력하시면 됩니다.
# dig {도메인}
$ dig dev.honeymoa.kr
정상적으로 설정되었다면 아래와 같이 status가 NOERROR로 나오고, ANSWER SECTION에 도메인과 연결된 IP 주소가 나옵니다. 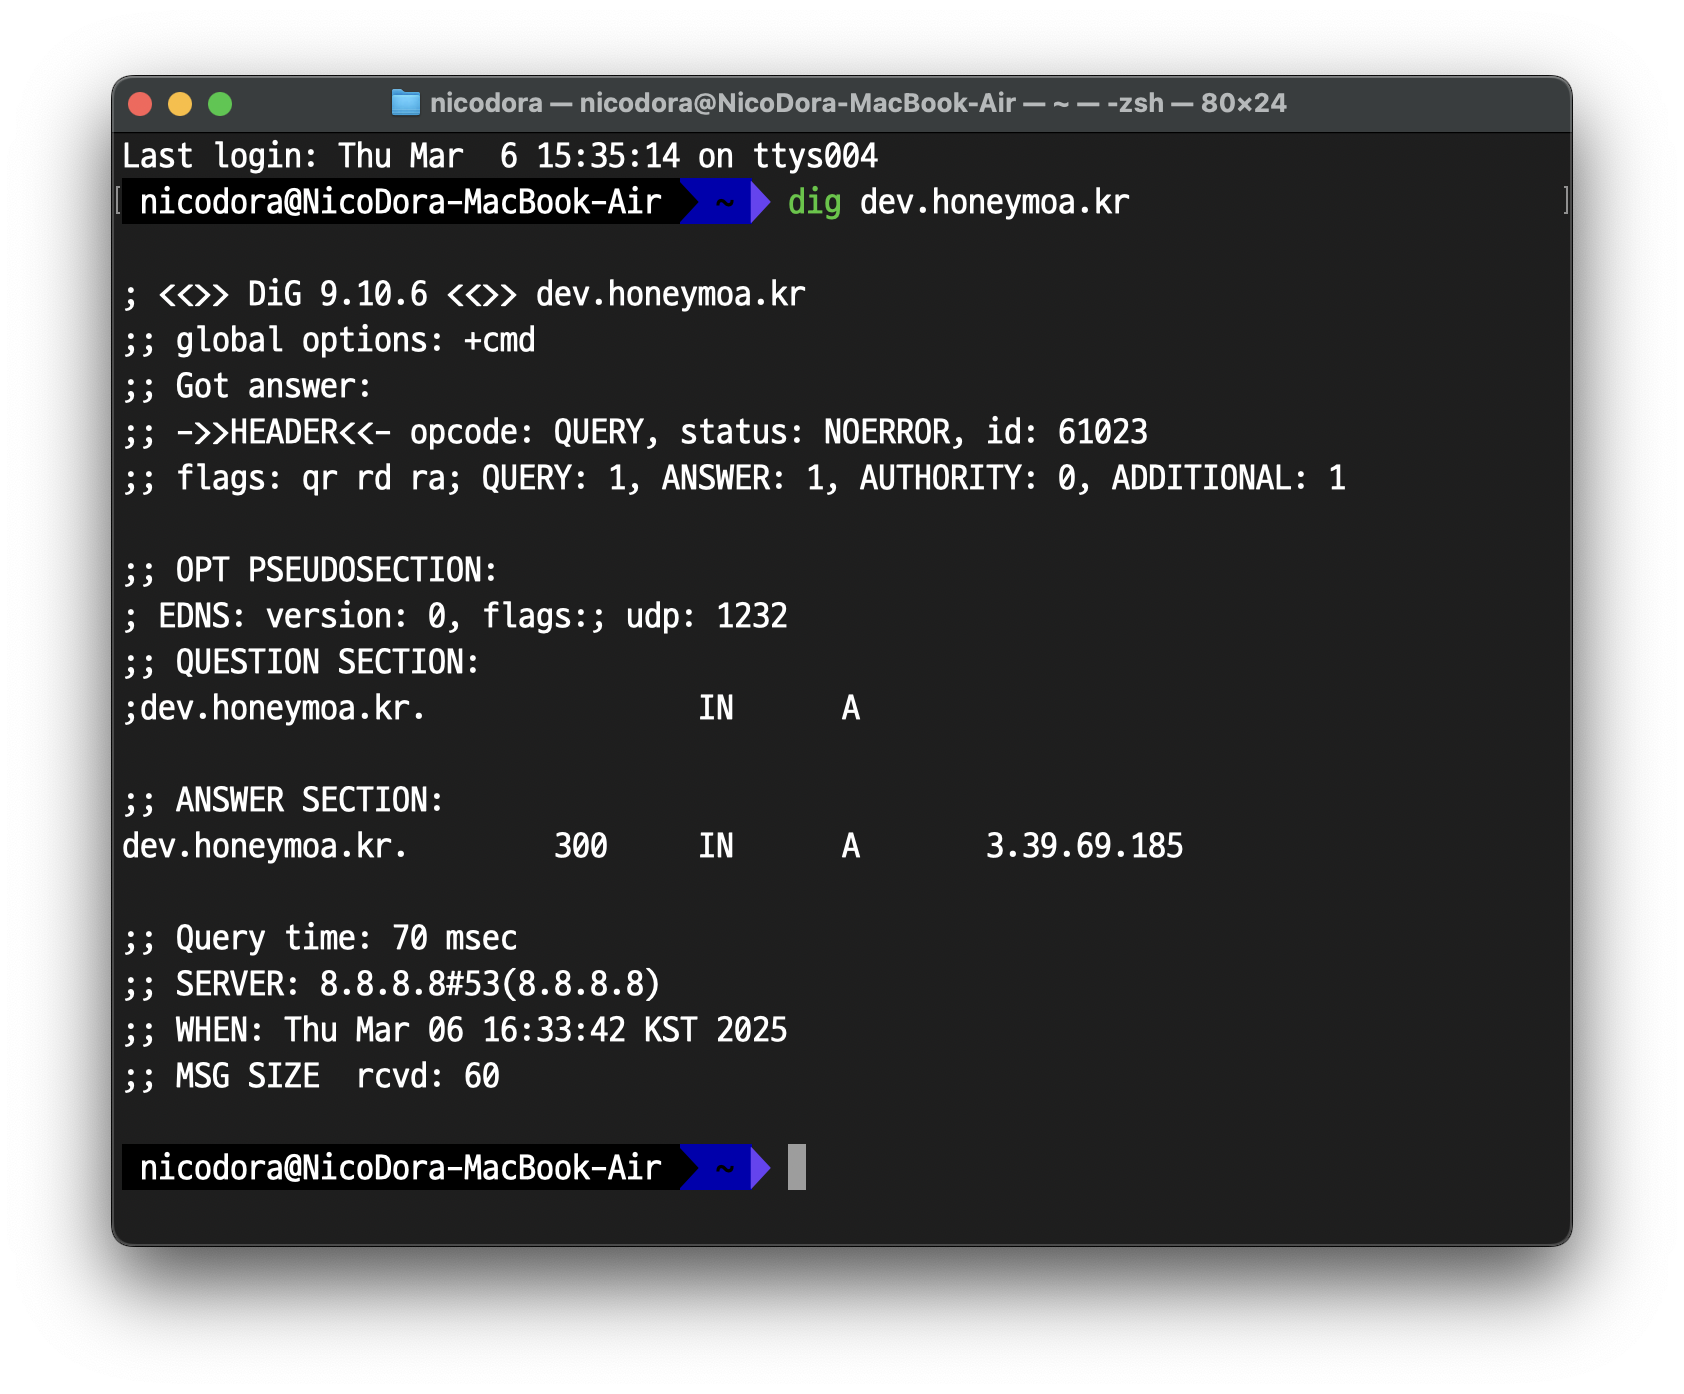
혹시나 status가 NXDOMAIN으로 나오신다면 도메인 설정이 잘못되었거나, DNS 서버에 도메인 정보가 전파되지 않은 것입니다.
다시한번 도메인 설정을 확인하시고, 올바르게 설정하셨다면 DNS 서버에 도메인 정보가 전파될 때까지 기다려주세요.
docker-compose.yaml 작성
📍 지금부터 파일 작성은 EC2 인스턴스에 접속했을 때의 루트 디렉토리(/home/ubuntu)에서 진행되니 유의해주세요!
레거시한 방법으로 SSL 인증서를 발급하려면 EC2 인스턴스에 Nginx를 설치하고, Certbot을 설치해야 하지만,
Docker를 사용하면 Nginx와 Certbot을 컨테이너로 한번에 실행할 수 있습니다.
아래와 같이 docker-compose.yaml 파일을 작성해줍니다.
# file: "docker-compose.yaml"
version: '3.7'

services:
  nginx:
    image: nginx:1.15-alpine
    container_name: nginx
    ports:
      - '80:80'
    volumes:
      - ./nginx/nginx.conf:/etc/nginx/nginx.conf
      - ./nginx/www/certbot:/var/www/certbot
      - ./nginx/logs:/var/log/nginx
    restart: unless-stopped

  certbot:
    image: certbot/certbot
    container_name: certbot
    volumes:
      - ./nginx/www/certbot:/var/www/certbot
      - ./nginx/ssl:/etc/letsencrypt
    command: certonly --webroot --webroot-path=/var/www/certbot -d {도메인}
간단하게 위 코드에 대해서 설명드리겠습니다.
nginx서비스image: 사용할 Nginx 이미지container_name: 컨테이너 이름ports: 호스트와 컨테이너의 포트 매핑 (80:80)volumes: 호스트와 컨테이너의 디렉토리 매핑restart: 컨테이너가 중지되었을 때 재시작할 정책 설정
certbot서비스image: 사용할 Certbot 이미지container_name: 컨테이너 이름volumes: 호스트와 컨테이너의 디렉토리 매핑command: Certbot 명령어 (인증서 발급)
nginx.conf 파일 작성
docker-compose.yaml 파일에서 볼륨 마운트 설정을 보면 nginx/ 디렉토리가 필요한 것을 확인할 수 있습니다.
전체적인 디렉토리 구조는 아래와 같습니다.
/home/ubuntu
├── docker-compose.yaml
├── nginx
│   ├── nginx.conf
│   ├── ssl/
│   │   ├── (certbot 인증서)
│   ├── logs/
│   └── www/
│       └── certbot/
└── .env
아래와 같이 nginx 디렉토리를 생성해줍니다.
$ mkdir nginx
그리고 nginx 디렉토리 안에 nginx.conf 파일을 생성해줍니다.
nginx.conf 파일은 Nginx가 실행될 때 사용하는 설정 파일로, 아래와 같이 작성해줍니다.
# file: "nginx/nginx.conf"
events {
  worker_connections 1024;
}

http {
  server {
    listen 80;
    server_name dev.honeymoa.kr; # server_name {도메인}

    location /.well-known/acme-challenge/ {
      root /var/www/certbot;
    }

    location / {
      return 404;
    }
  }
}
nginx.conf 파일 설명
events블록에서는 Nginx 작업자가 동시에 처리할 수 있는 최대 연결 수를 설정합니다. 여기서worker_connections 1024;는 각각의 작업자가 최대 1024개의 연결을 동시에 처리할 수 있도록 지정합니다.다음으로,
http블록 내부에 정의된server블록은 80번 포트를 리스닝하며, 도메인에 대한 요청을 처리합니다.- 첫 번째
location블록은/.well-known/acme-challenge/경로에 대한 요청을 처리합니다. 여기서는 해당 경로의 요청에 대해/var/www/certbot디렉토리에서 파일을 제공하도록 설정되어 있습니다. - 두 번째 location 블록은
/로 시작하는 모든 다른 요청에 대해 404 응답을 반환합니다. 인증서 발급 관련 요청 외의 다른 접근을 차단하기 위한 설정입니다.
- 첫 번째
나머지 /nginx/www/, /nginx/logs/, /nginx/ssl/ 디렉토리는 Nginx 실행 시 자동으로 생성되기 때문에 수동으로 생성할 필요는 없습니다.
Nginx 임시 실행
nginx.conf 파일 작성이 완료되었으므로 이제 Nginx를 실행해보겠습니다.
docker-compose.yaml 파일이 있는 디렉토리에서 아래 명령어를 입력하여 Nginx를 실행합니다.
(만약 docker-compose 파일의 이름이 다르다면 -f 옵션을 사용하여 파일 이름을 지정해주셔야 합니다.)
$ docker-compose up -d nginx
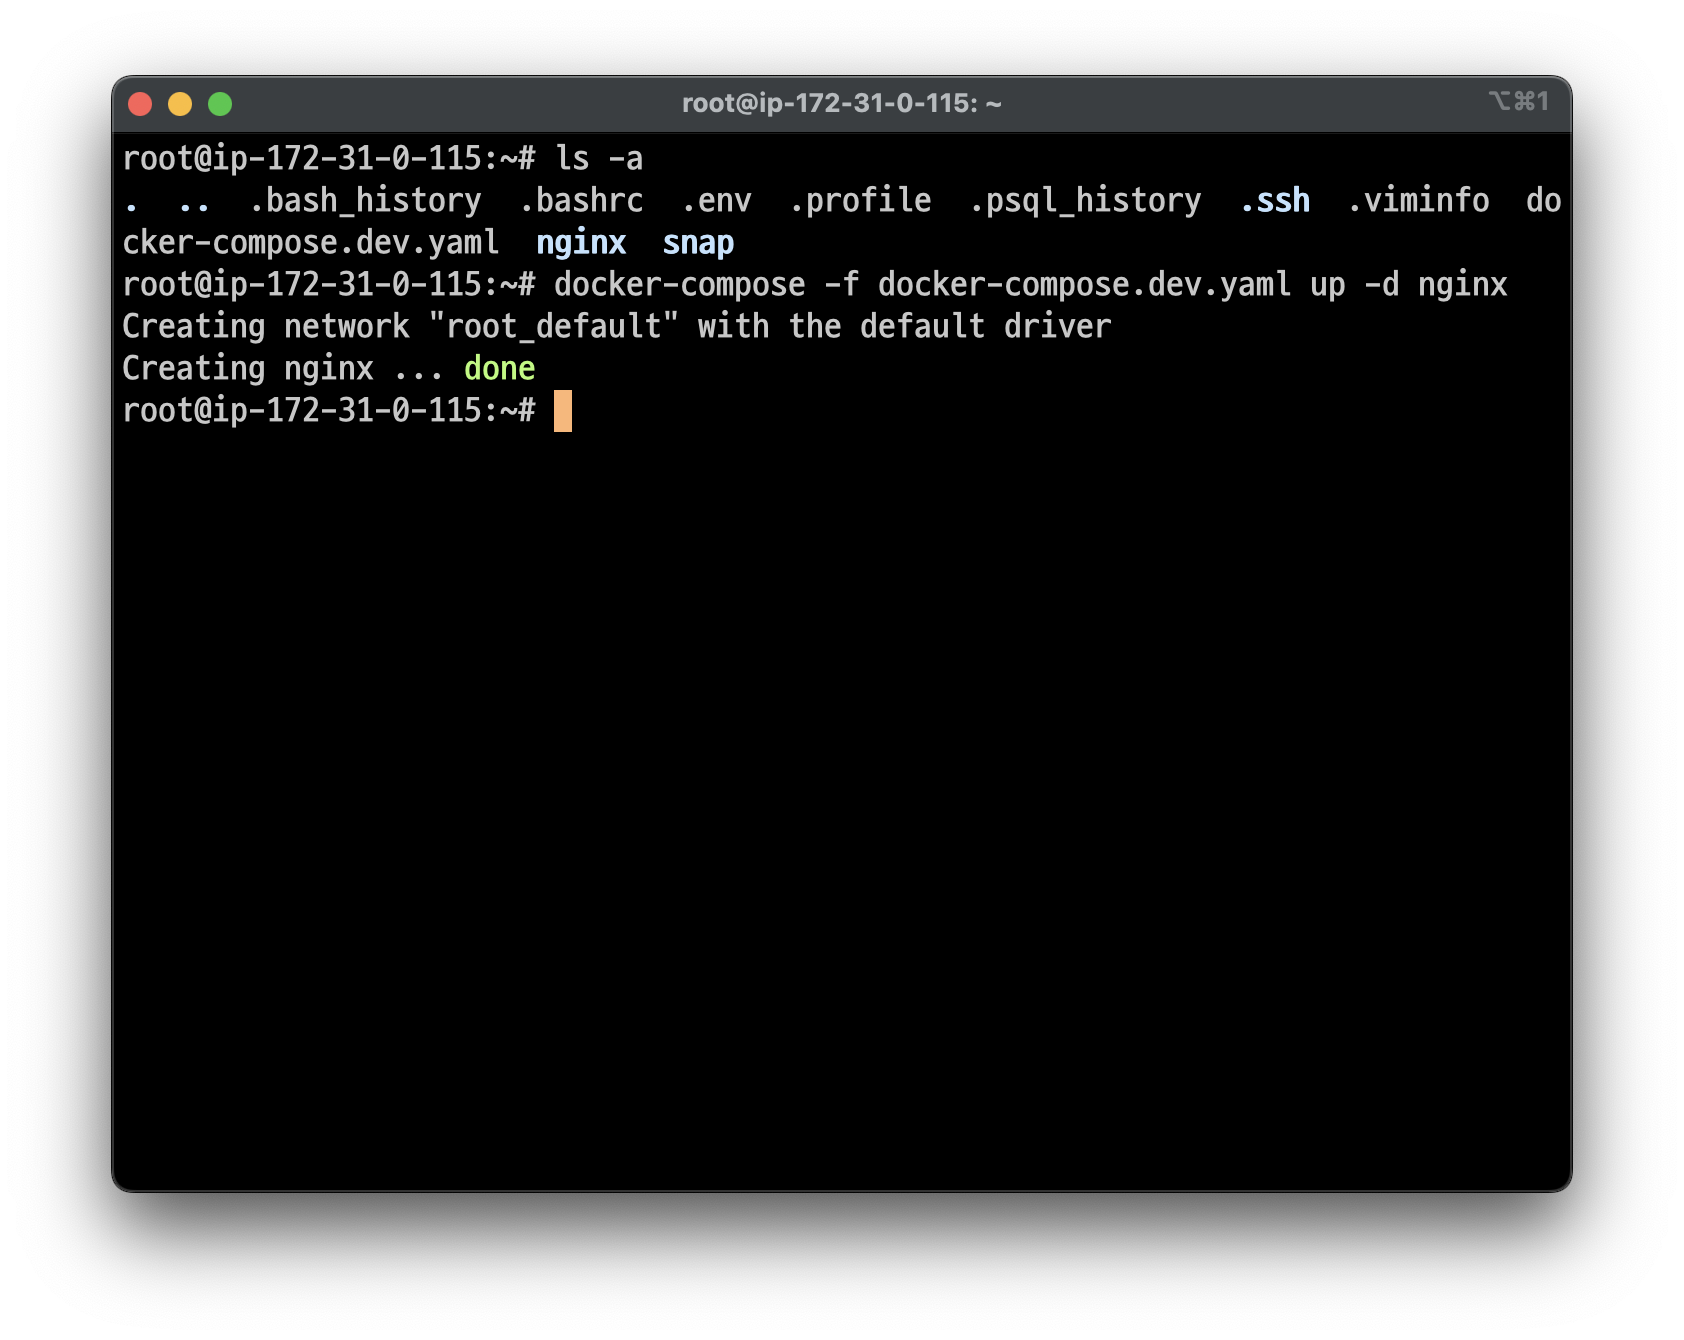
컨테이너가 정상적으로 실행되었는지 확인합니다.
# 로그가 없어야 정상적으로 실행된 것입니다.
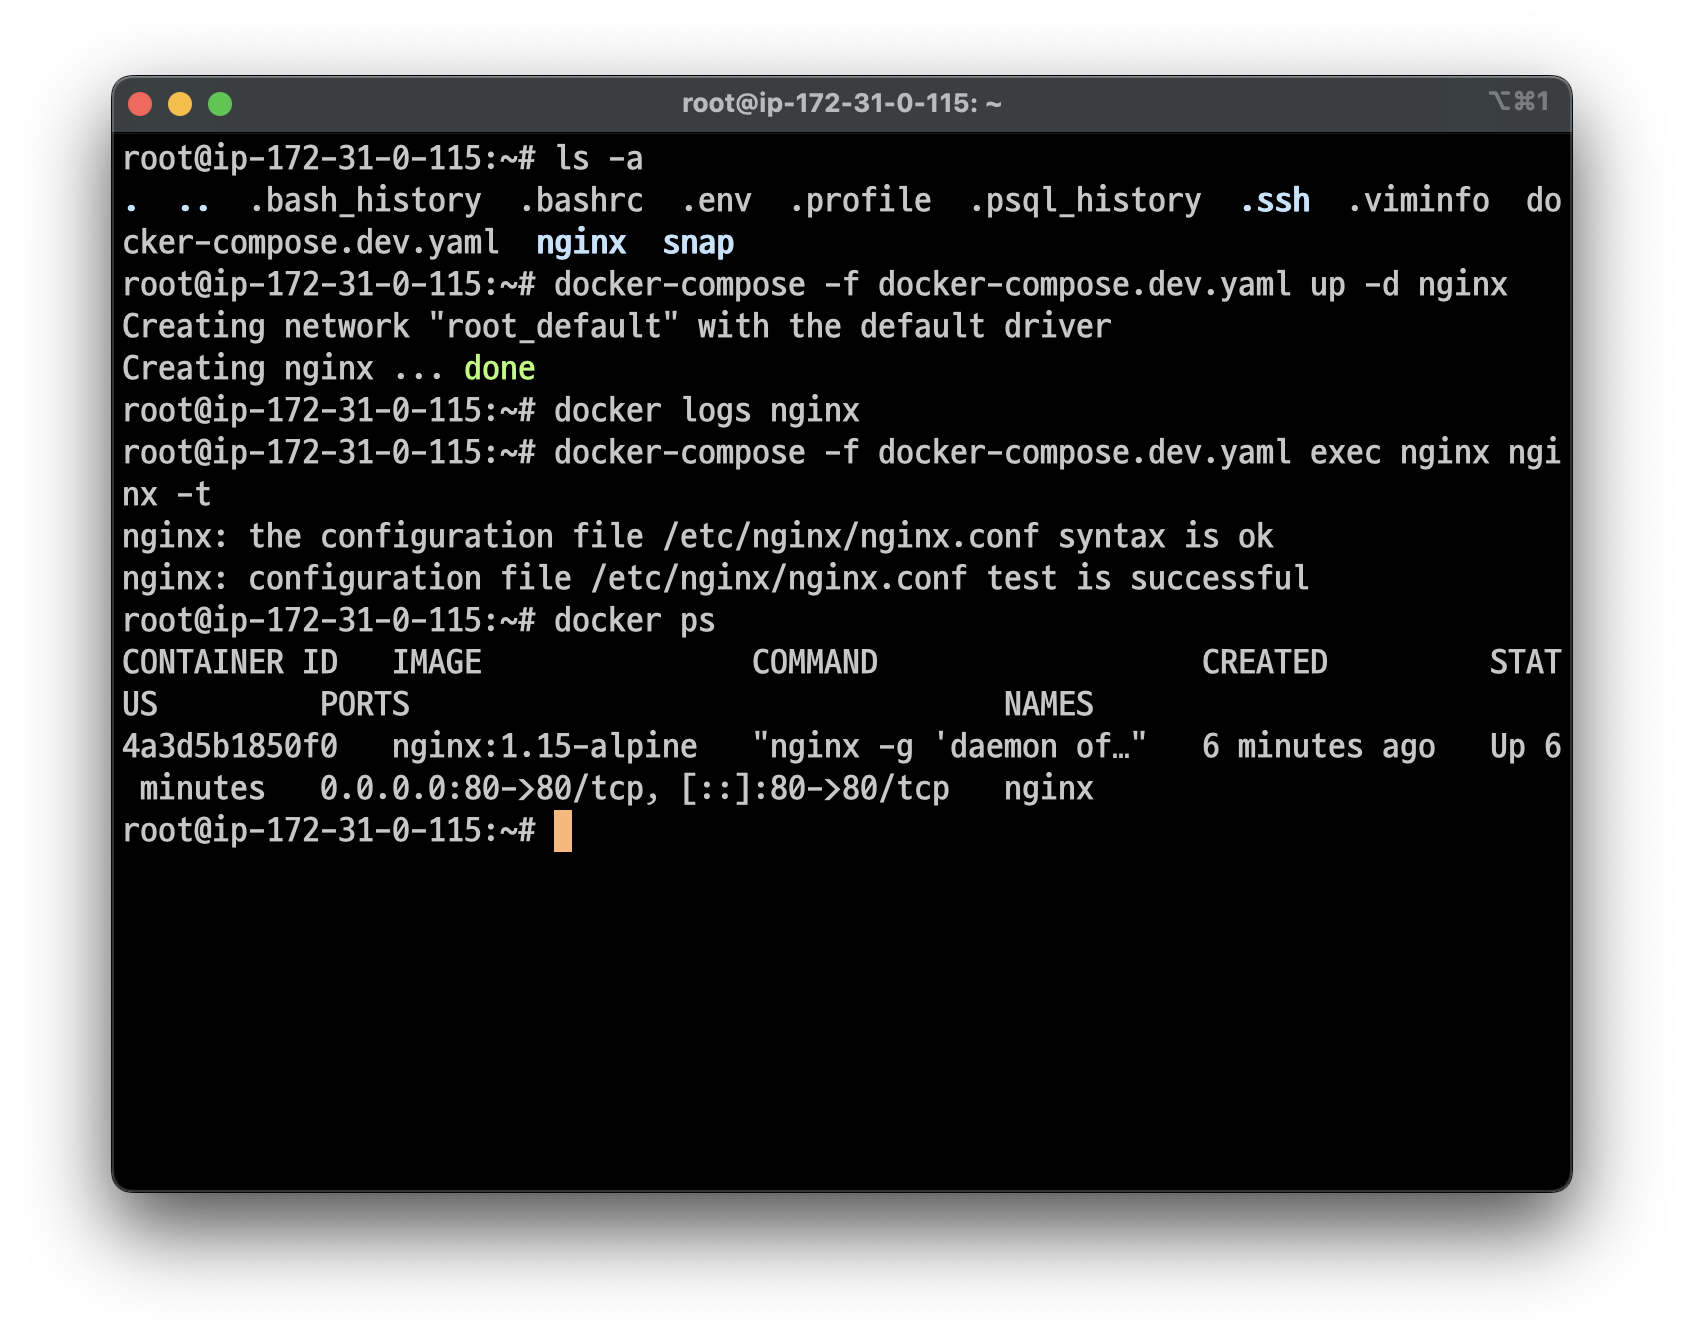
$ docker logs nginx
# nginx.conf 파일 문법 검사
$ docker-compose exec nginx nginx -t
# nginx가 실행중인지 확인
$ docker ps
Certbot으로 SSL 인증서 발급
이제 Nginx가 실행되었으니 Certbot을 사용하여 SSL 인증서를 발급받아보겠습니다.
1️⃣ docker-compose.yaml 파일이 있는 디렉토리에서 아래 명령어를 입력하여 Certbot 컨테이너를 실행합니다.
$ docker-compose run --rm certbot
2️⃣ 긴급 갱신 및 보안 알림에 사용할 이메일 주소를 입력하라고 나오니 적절한 이메일 주소를 입력해줍니다.
Saving debug log to /var/log/letsencrypt/letsencrypt.log
Enter email address (used for urgent renewal and security notices)
 (Enter 'c' to cancel):
3️⃣ 약관에 동의하라는 메시지가 나오는데, 약관에 동의해야 인증서 발급이 되니 Y를 입력해줍니다.
- - - - - - - - - - - - - - - - - - - - - - - - - - - - - - - - - - - - - - - -
Please read the Terms of Service at:
https://letsencrypt.org/documents/LE-SA-v1.5-February-24-2025.pdf
You must agree in order to register with the ACME server. Do you agree?
- - - - - - - - - - - - - - - - - - - - - - - - - - - - - - - - - - - - - - - -
(Y)es/(N)o: Y
4️⃣ 홍보성 메일 수신 여부를 묻는 메시지가 나오는데, 원하시는 대로 선택하시면 됩니다.
저는 메일 수신을 원하지 않아서 N을 입력했습니다.
- - - - - - - - - - - - - - - - - - - - - - - - - - - - - - - - - - - - - - - -
Would you be willing, once your first certificate is successfully issued, to
share your email address with the Electronic Frontier Foundation, a founding
partner of the Let's Encrypt project and the non-profit organization that
develops Certbot? We'd like to send you email about our work encrypting the web,
EFF news, campaigns, and ways to support digital freedom.
- - - - - - - - - - - - - - - - - - - - - - - - - - - - - - - - - - - - - - - -
(Y)es/(N)o: N
📍 아래와 같은 에러가 발생한다면 AWS 보안 그룹에서 80번 포트가 열려있는지 확인해주세요!
Account registered.
Requesting a certificate for dev.honeymoa.kr

Certbot failed to authenticate some domains (authenticator: webroot). The Certificate Authority reported these problems:
  Domain: dev.honeymoa.kr
  Type:   connection
  Detail: 3.39.69.185: Fetching http://dev.honeymoa.kr/.well-known/acme-challenge/SLl0wrWe_5cmAZN6XAX0zq8kboOBEETuiT5WcMvSrtM: Timeout during connect (likely firewall problem)

Hint: The Certificate Authority failed to download the temporary challenge files created by Certbot. Ensure that the listed domains serve their content from the provided --webroot-path/-w and that files created there can be downloaded from the internet.

Some challenges have failed.
Ask for help or search for solutions at https://community.letsencrypt.org. See the logfile /var/log/letsencrypt/letsencrypt.log or re-run Certbot with -v for more details.
5️⃣ 인증서 발급이 완료되면 아래와 같은 메시지가 출력됩니다.
Requesting a certificate for dev.honeymoa.kr

Successfully received certificate.
Certificate is saved at: /etc/letsencrypt/live/dev.honeymoa.kr/fullchain.pem
Key is saved at:         /etc/letsencrypt/live/dev.honeymoa.kr/privkey.pem
This certificate expires on 2025-06-04.
These files will be updated when the certificate renews.

NEXT STEPS:
- The certificate will need to be renewed before it expires. Certbot can automatically renew the certificate in the background, but you may need to take steps to enable that functionality. See https://certbot.org/renewal-setup for instructions.

- - - - - - - - - - - - - - - - - - - - - - - - - - - - - - - - - - - - - - - -
If you like Certbot, please consider supporting our work by:
 * Donating to ISRG / Let's Encrypt:   https://letsencrypt.org/donate
 * Donating to EFF:                    https://eff.org/donate-le
- - - - - - - - - - - - - - - - - - - - - - - - - - - - - - - - - - - - - - - -
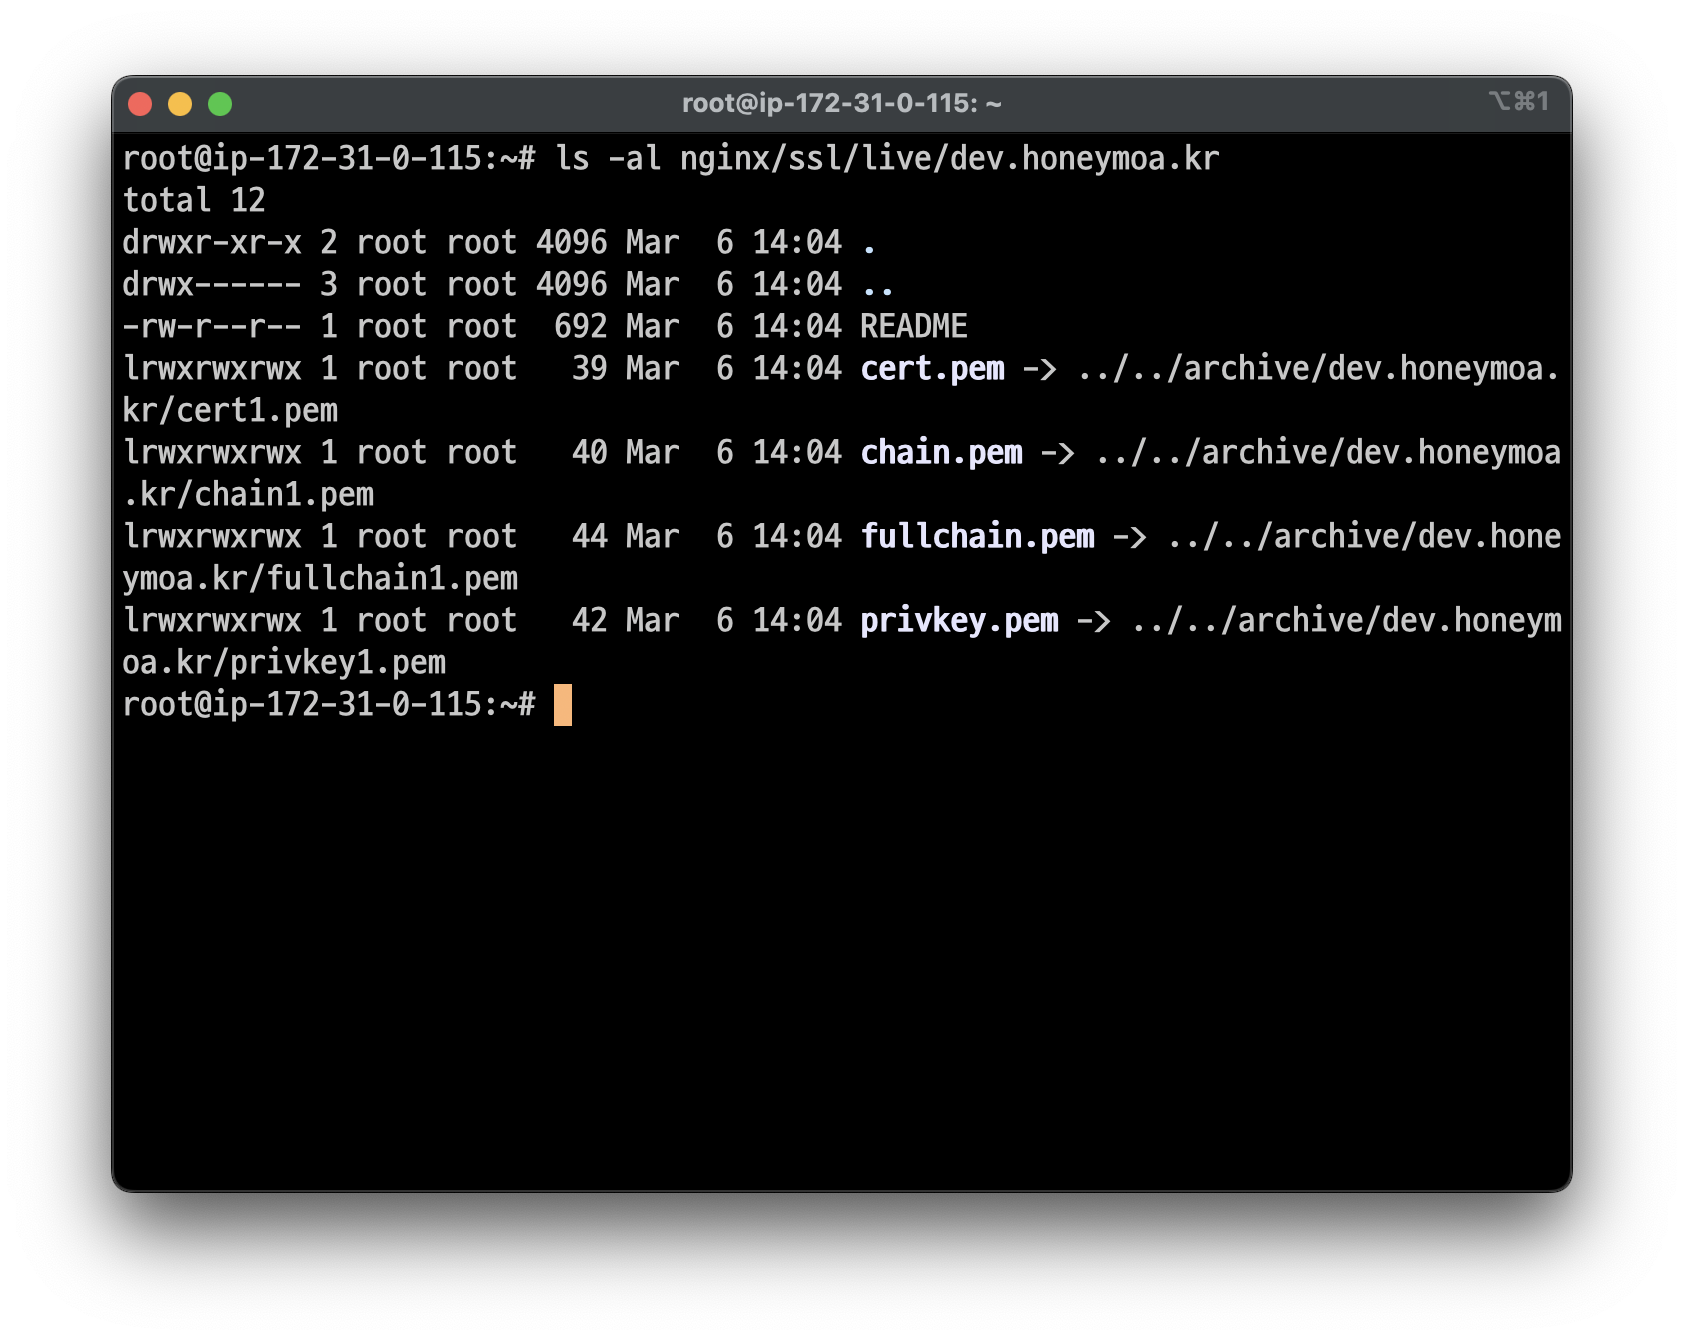
인증서 발급에 성공하면 /nginx/ssl/live/{도메인}/ 디렉토리 안에 인증서와 개인키가 저장됩니다.
인증서와 개인키는 각각 fullchain.pem과 privkey.pem 파일에 저장됩니다.
인증서와 개인키가 정상적으로 발급되었는지 확인하고 싶다면 아래 명령어를 입력하시면 됩니다.
# 인증서 확인
$ ls -al /nginx/ssl/live/{도메인}
docker-compose.yaml 파일 업데이트
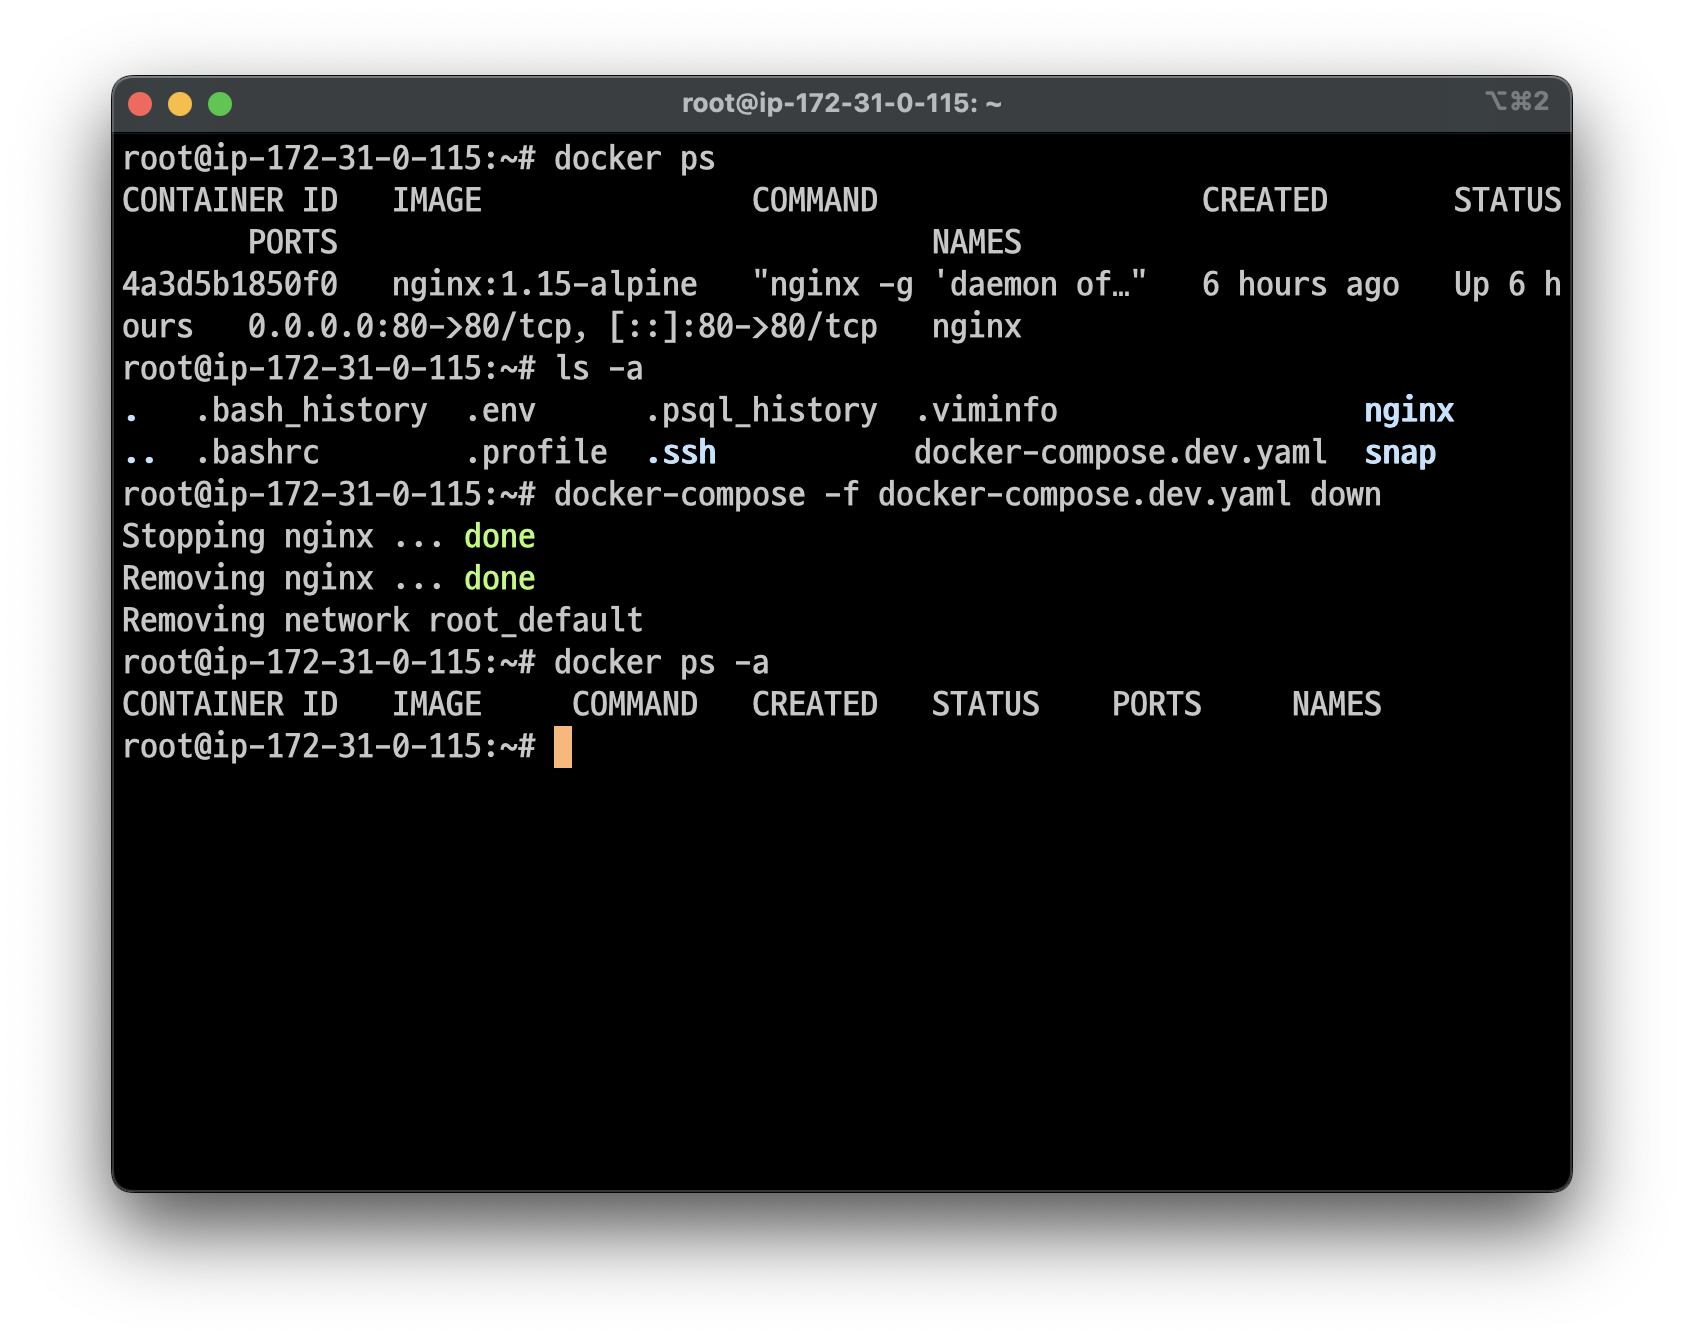
인증서 발급이 완료되었으니 아래 명령어를 입력하여 Nginx를 종료합니다.
$ docker-compose down
이제 docker-compose.yaml 파일을 완성해봅시다.
# file: "docker-compose.yaml"
version: '3.8'

services:
  honey-moa-dev:
    image: nicodora/honey-moa-dev:latest
    container_name: honey-moa-dev
    env_file:
      - .env
    ports:
      - '3000:3000'
    restart: always
    networks:
      - honey-moa-dev-network

  nginx:
    image: nginx:1.15-alpine
    container_name: nginx
    ports:
      - '80:80'
      - '443:443'
    volumes:
      - ./nginx/nginx.conf:/etc/nginx/nginx.conf # nginx.conf 파일
      - ./nginx/www/certbot:/var/www/certbot # certbot이 사용할 디렉토리
      - ./nginx/ssl:/etc/letsencrypt # ssl 인증서 저장 디렉토리
      - ./nginx/logs:/var/log/nginx # nginx 로그 저장 디렉토리
    depends_on:
      - honey-moa-dev
    restart: unless-stopped
    networks:
      - honey-moa-dev-network

  certbot:
    image: certbot/certbot
    container_name: certbot
    volumes:
      - ./nginx/www/certbot:/var/www/certbot # certbot이 사용할 디렉토리
      - ./nginx/ssl:/etc/letsencrypt # ssl 인증서 저장 디렉토리
    entrypoint: "/bin/sh -c 'trap exit TERM; while :; do certbot renew; sleep 12h & wait $${!}; done;'" # 인증서 자동 갱신
    restart: unless-stopped
    networks:
      - honey-moa-dev-network

networks:
  honey-moa-dev-network: # 네트워크 설정
    driver: bridge
docker-compose.yaml 파일 설명
docker-compose.yaml파일에서honey-moa-dev(백엔드 서버),nginx,certbot을 정의합니다.- nginx 서비스는 80번과 443번 포트를 리스닝하고, 볼륨 마운트를 통해 nginx.conf 파일과 인증서, 로그 디렉토리를 연결합니다.
depends_on:옵션을 사용하여 Nginx가 백엔드 서버에 의존하도록 설정하여 백엔드 서버가 실행된 후에 시작됩니다.
certbot서비스는entrypoint를 사용하여 Certbot이 12시간마다 인증서를 갱신하도록 설정했습니다.networks:옵션을 사용하여honey-moa-dev-network라는 네트워크를 생성하고, 모든 서비스가 이 네트워크를 사용하도록 설정했습니다.
nginx.conf 파일 업데이트
인증서 발급이 완료되었으므로 요청을 HTTPS로 받을 수 있도록 nginx.conf 파일도 업데이트 해줍니다.
# file: "nginx/nginx.conf"
events {
  worker_connections 1024; # 워커 프로세스가 처리할 수 있는 최대 연결 수
}

http {
  upstream backend {
      server honey-moa-dev:3000; # 백엔드 컨테이너 연결
  }

  # HTTPS 설정
  server {
    listen 443 ssl;
    server_name dev.honeymoa.kr; # server_name {도메인}

    ssl_certificate /etc/letsencrypt/live/dev.honeymoa.kr/fullchain.pem; # SSL 인증서 경로
    ssl_certificate_key /etc/letsencrypt/live/dev.honeymoa.kr/privkey.pem; # SSL 개인키 경로

    ssl_protocols TLSv1.2 TLSv1.3;
    ssl_ciphers HIGH:!aNULL:!MD5;

    location / {
      proxy_pass http://backend;
      proxy_http_version 1.1;
      proxy_set_header Upgrade $http_upgrade;
      proxy_set_header Connection 'upgrade';
      proxy_set_header Host $host;
      proxy_cache_bypass $http_upgrade;
    }
  }

  # HTTP -> HTTPS 리디렉션 설정
  server {
    listen 80;
    server_name dev.honeymoa.kr; # server_name {도메인}

    location /.well-known/acme-challenge/ {
      root /var/www/certbot;
    }

    return 301 https://$host$request_uri;
  }
}
nginx.conf 파일 설명
upstream backend블록은 백엔드 서버의 주소를 설정합니다.- 여기서는
honey-moa-dev:3000으로 설정하여docker-compose.yaml에서 정의했던 서비스 이름을 사용합니다.
- 여기서는
- 첫번째
server블록은 HTTPS 요청을 처리합니다.listen 443 ssl;은 443번 포트를 SSL로 리스닝하도록 설정합니다.ssl_certificate와ssl_certificate_key는 발급받은 SSL 인증서와 개인키의 경로를 설정합니다.ssl_protocols와ssl_ciphers는 SSL 프로토콜과 암호화 방식을 설정합니다.
location /블록은 모든 요청을 백엔드 서버로 프록시 패스합니다.proxy_pass는 요청을 백엔드 서버로 전달합니다.proxy_set_header는 요청 헤더를 설정하여 클라이언트의 정보를 백엔드 서버에 전달합니다.
- 두번째
server블록은 HTTP 요청을 HTTPS로 리디렉션합니다.
docker-compose 실행
이제 모든 설정이 완료되었으니 아래 명령어를 입력하여 컨테이너를 실행해봅시다!
$ docker-compose up -d
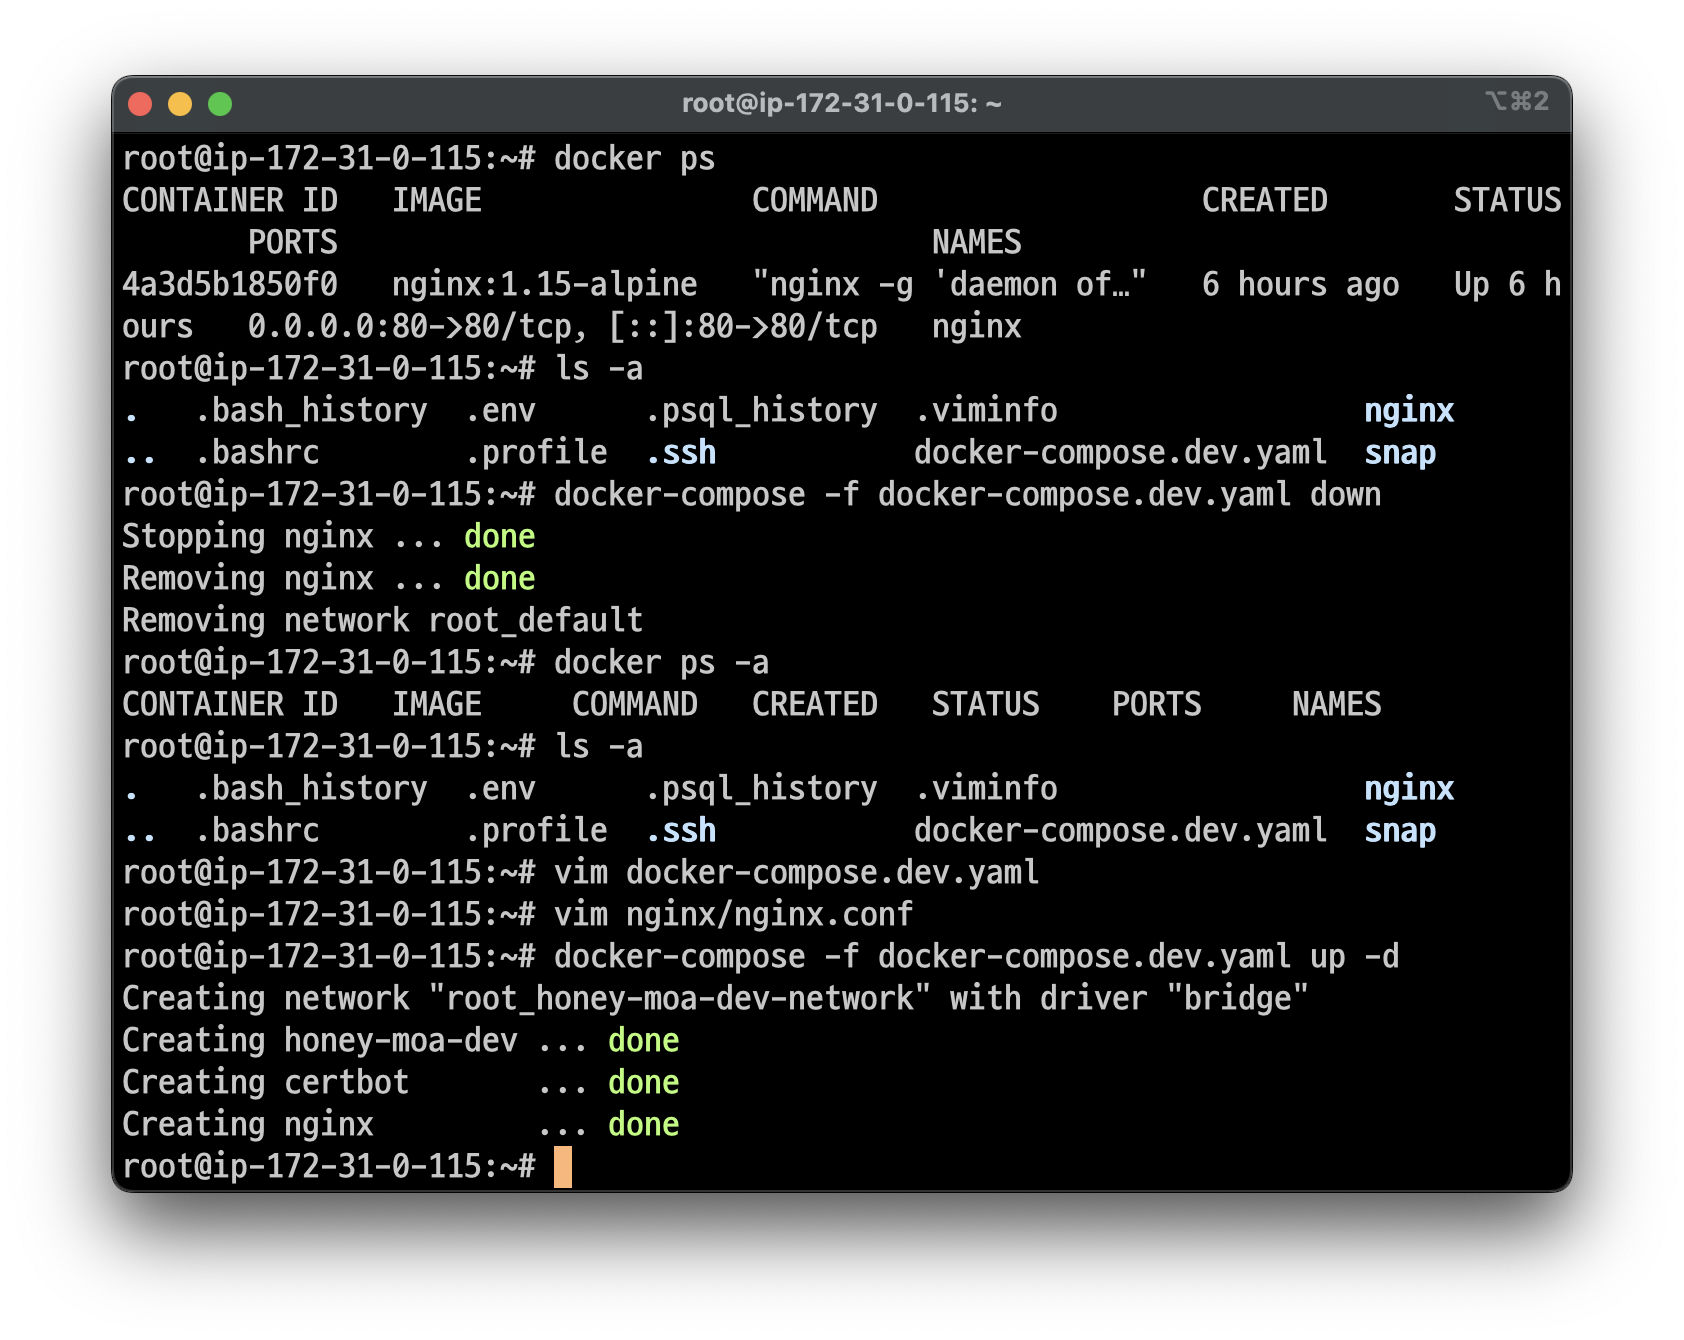
Nginx 컨테이너가 정상적으로 실행되었는지 확인:
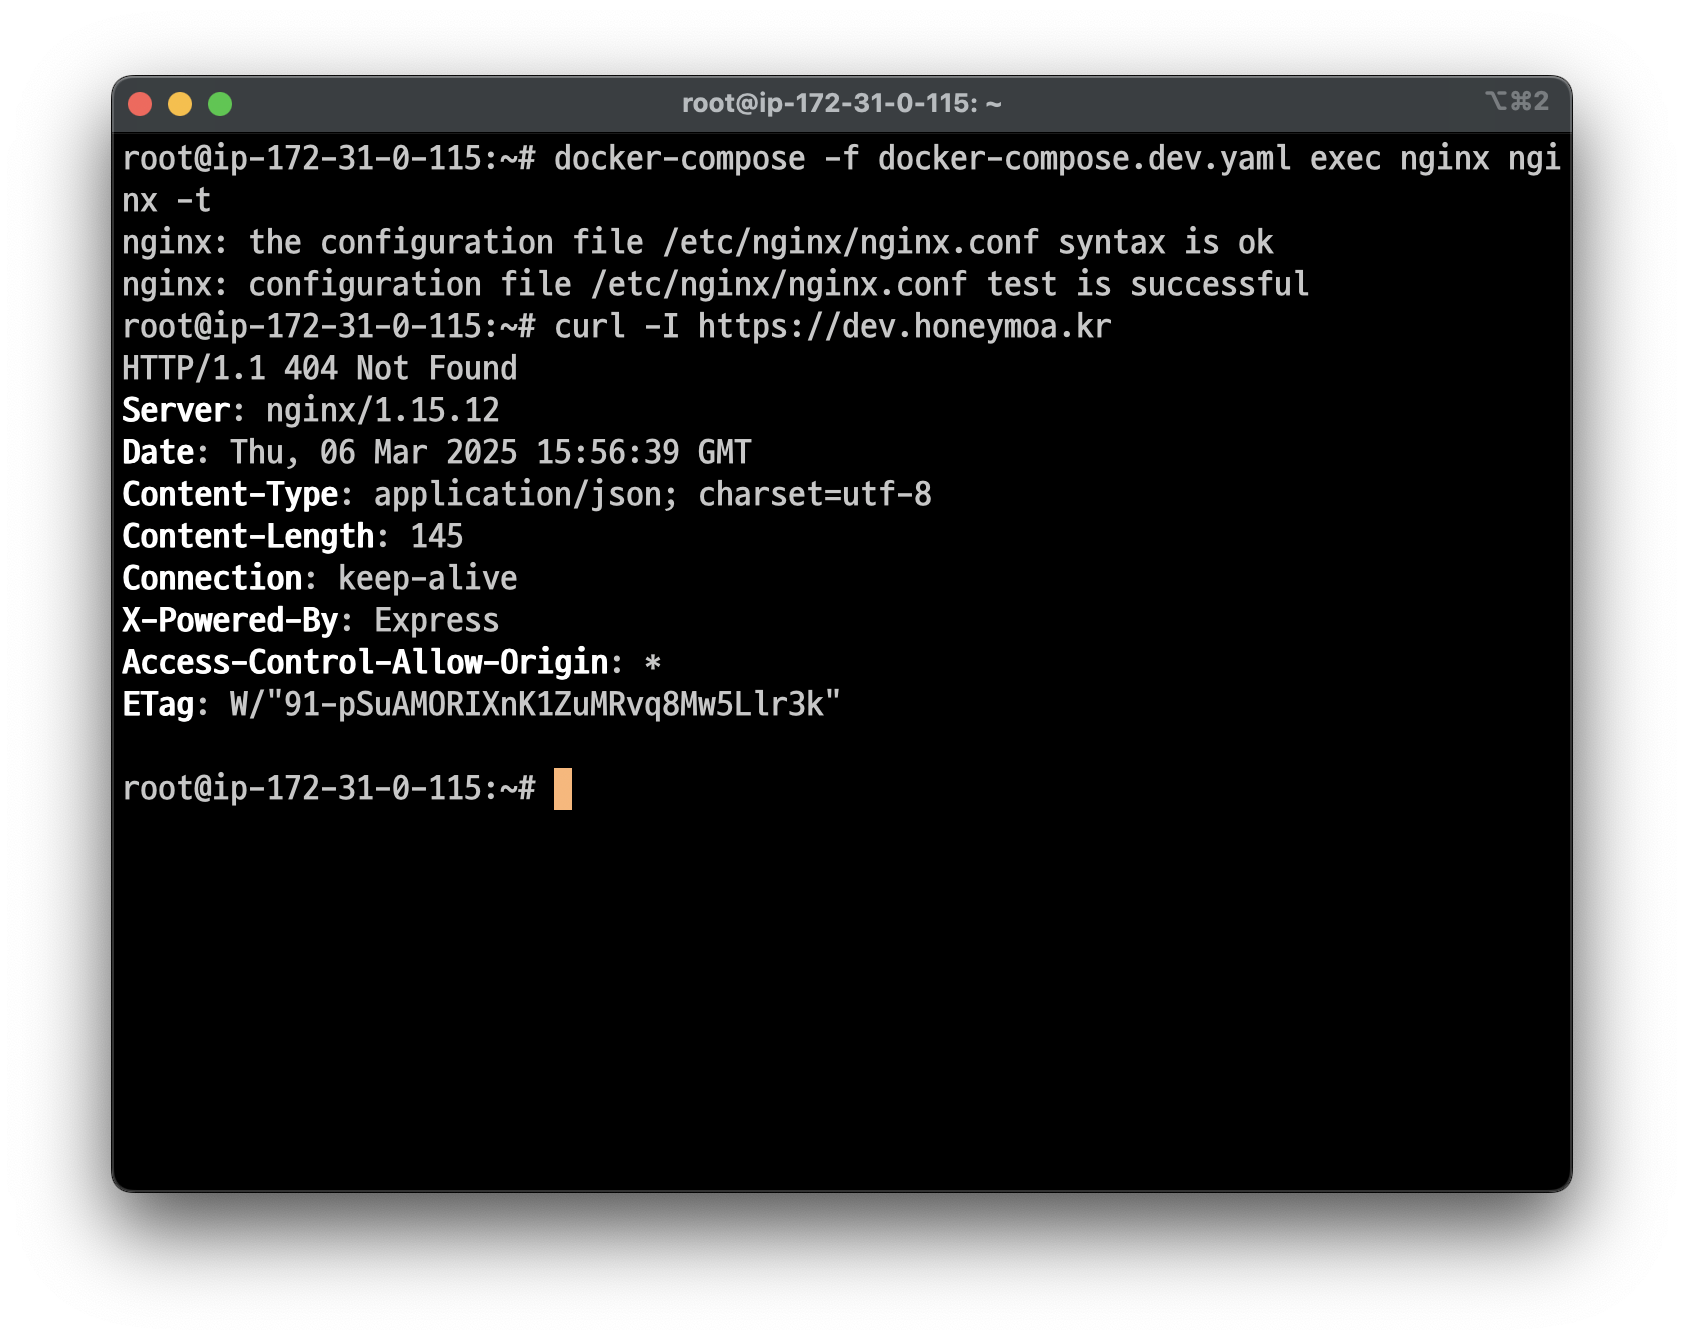
# nginx.conf 파일 문법 검사
$ docker-compose exec nginx nginx -t

# HTTPS 요청 확인
# curl -I https://{도메인}
$ curl -I https://dev.honeymoa.kr
Certbot 컨테이너가 정상적으로 실행되었는지 확인:
# certbot 컨테이너 실행 확인
$ docker logs certbot
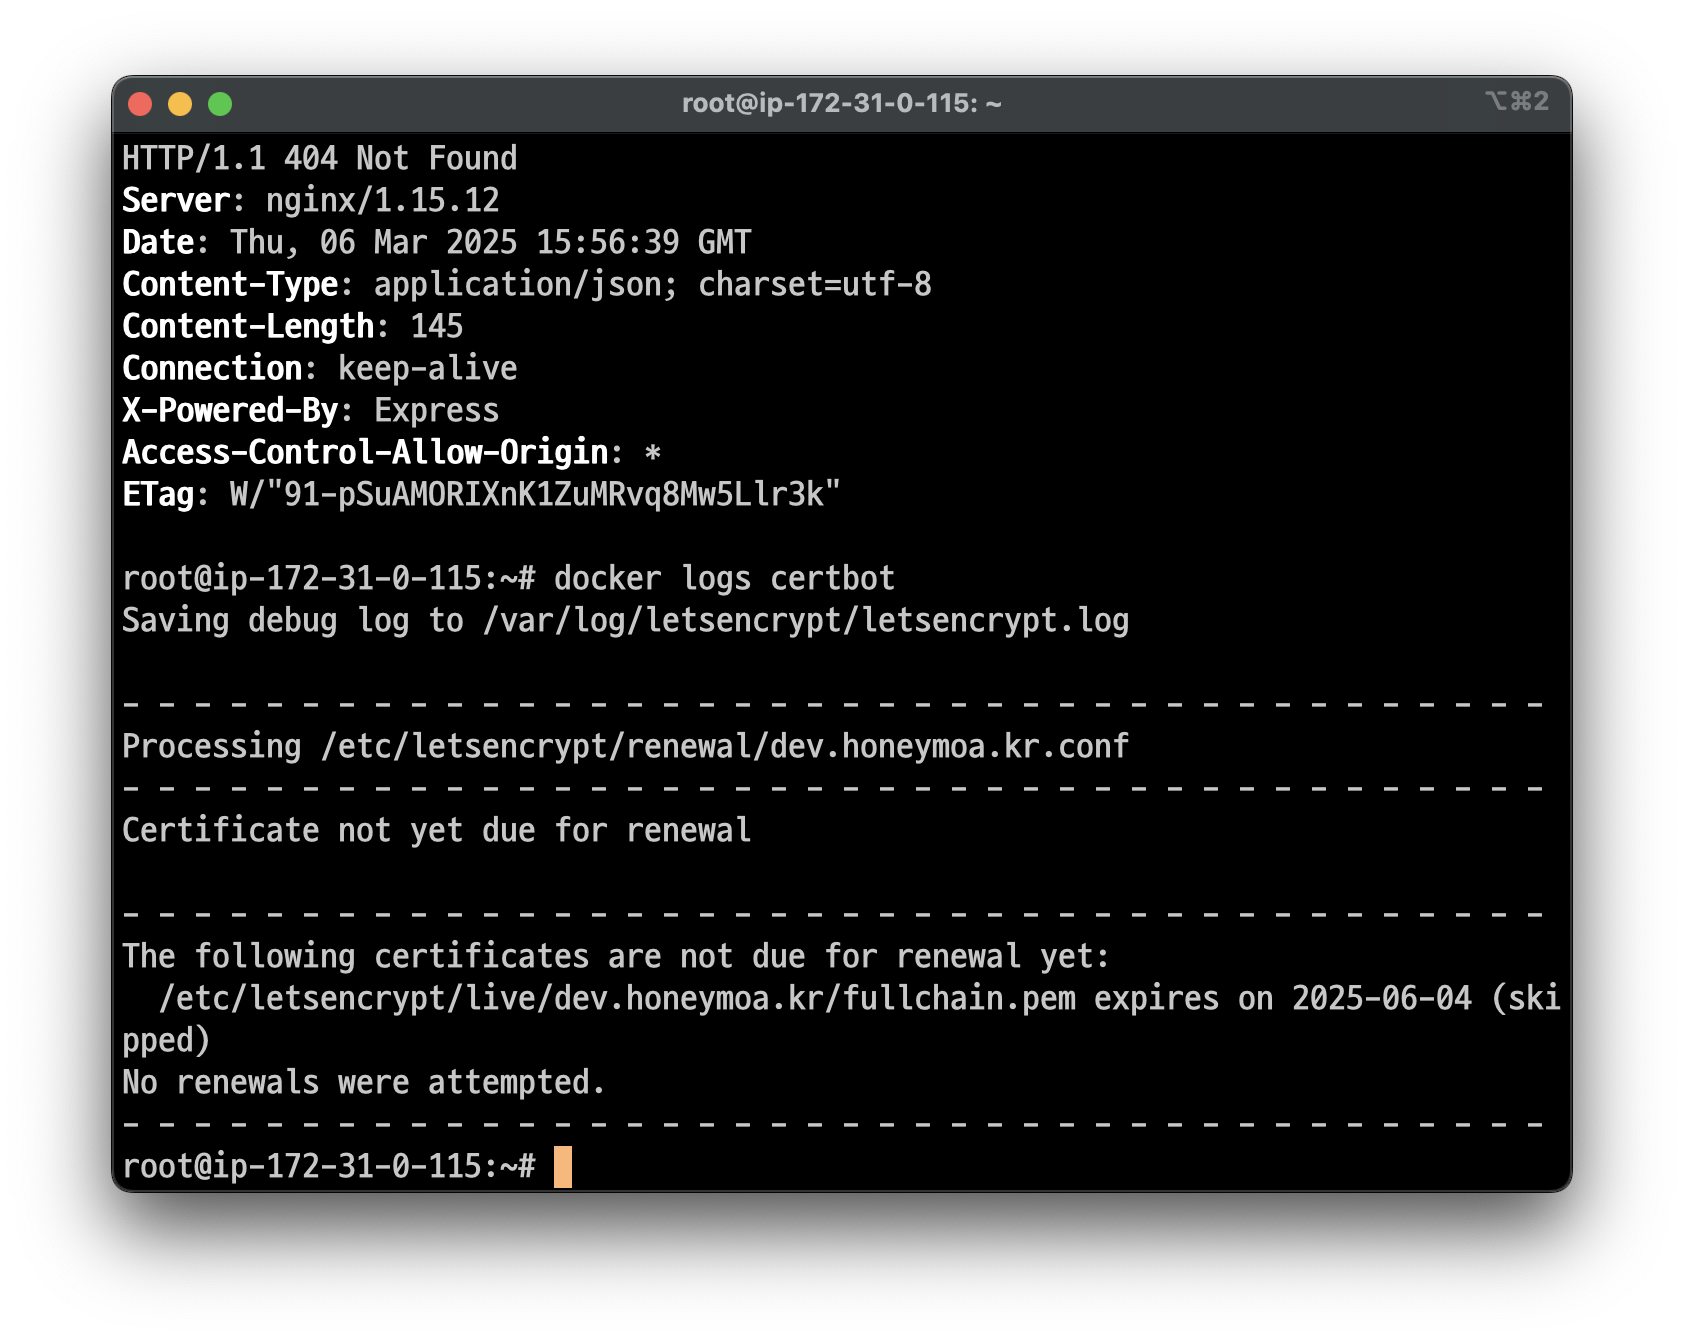
각 컨테이너들의 실행 확인까지 마치셨다면 SSL 인증서 적용 후, Certbot을 이용한 자동 갱신까지 완성입니다! 🎉
마치며
오늘은 AWS EC2 인스턴스에서 Nginx와 Certbot을 사용하여 SSL 인증서를 발급받고 자동갱신까지 설정하는 방법을 알아보았습니다. 처음 SSL 인증서를 발급받는 과정을 접한다면 생소하고, 특히 nginx.conf 파일과 docker-compose.yaml 파일을 작성하는 부분에서 어려움을 느끼실 수 있는데요. 조급해 하지 말고 차근차근 각 단계에 대해 알아보고 여러번 적용해보면 금방 익숙해질 수 있을겁니다.
그럼 다음 포스트에서 뵙겠습니다! 뾰로롱~